From time to time, the MXR design team likes to invite guest designers to collaborate on pedals. It’s one of many things we do to keep a fresh and forward-thinking perspective, serving MXR’s ultimate mission to provide players with innovative, practical stompboxes that will stand up to the rigors of the road. In 2014, we worked with Italian pedal designer Carlo Sorasio to create the Il Torino™ Overdrive, and in 2015, we worked with Fuzzrocious Pedals’ Ryan Ratajski to create the MXR Bass Distortion.
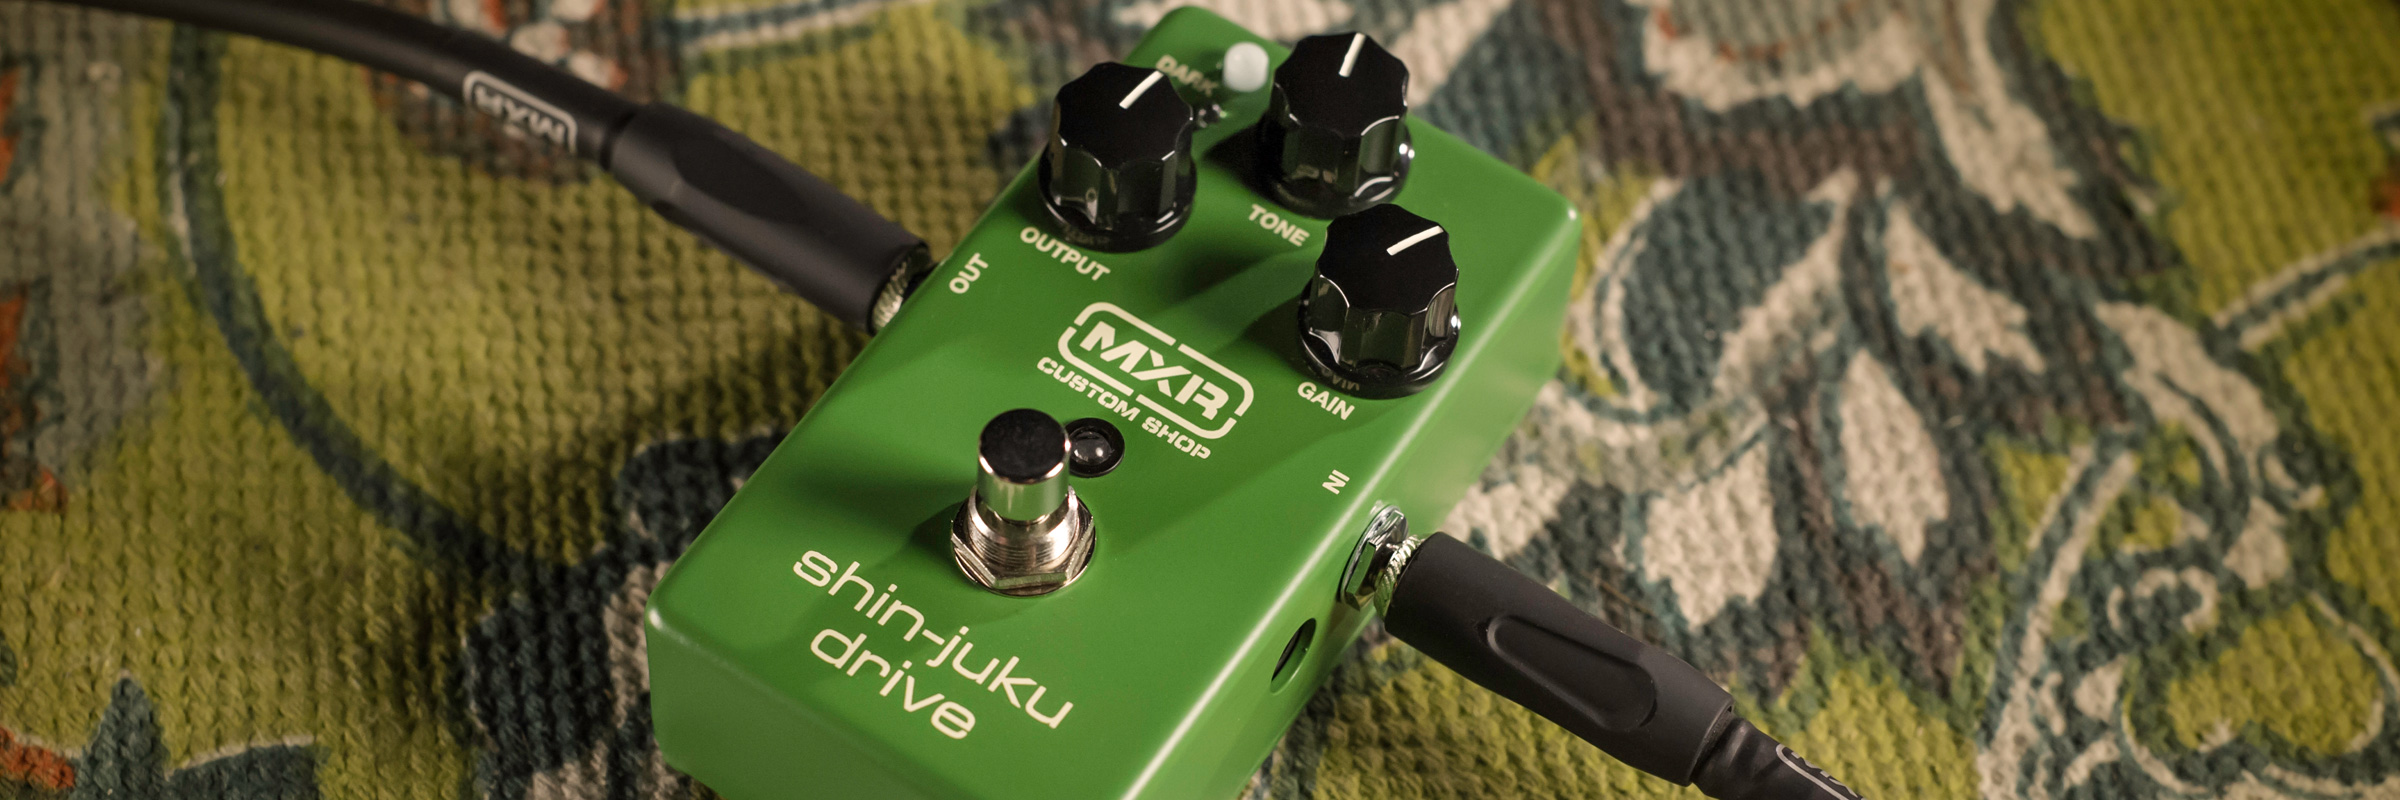
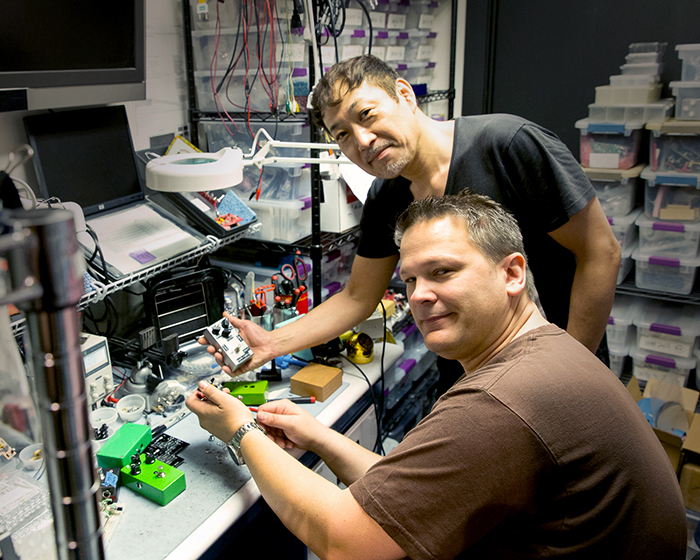
This year, we worked with Shin Suzuki, Japan’s most celebrated pedal designer and the owner of Shin’s Music, where he also builds custom amps and guitars for artists. He leant us his intimate knowledge of a legendary boutique amp to create the Shin-Juku™ Drive, a pedal that provides smooth, wide open overdrive with tons of sustain and incredibly fast response time to every playing detail. The Shin-Juku Drive’s simple three-knob interface allows you to call up a wide range of sounds, from an organic boost to full on grinding overdrive, with a Dark switch to cut high frequencies for a darker, mellower sound.
During a recent visit to the US, Shin sat down to tell us a bit about himself and the Shin-Juku Drive.
Shin Suzuki & Jeorge Tripps
How did you get into the pedal-making business?
I first became interested in building pedals when I was in middle school. By the time I was in high school, I was already building pedals for my musician friends. Basically, I taught myself how to repair and modify equipment as well as build new equipment from scratch, and one day I decided to do it for a living. Today, many Japanese artists and even some famous American artists use equipment that I have made or modified in some way.
What was your goal when you designing this pedal?
I wanted to create a pedal that would match the big, wide open sound, the smooth overdrive, and the fast response of a particularly mythical style of boutique amplifier. I know the style very intimately because I have not only played and listened to them, but also repaired them. I think that the resulting pedal, the Shin-Juku Drive, really nails it. Not only the sound, but also the feel and response to your attack.
It’s not simply an overdrive—it’s like an amp in a pedal box. At certain settings, the Shin-Juku Drive is perfect to use as an “always-on” effect to put the finishing touch on the tone coming straight out of your guitar.
Jeorge & Shin going over a Shin-Juku Drive prototype
How were you able to achieve that sound?
Well, I knew exactly what sound I wanted, and as I said, I am well-acquainted with the inner-workings of the amp that produces that sound. I had a good idea of where to start the design process. I chose a bunch of different parts that I thought would get me close to the sound of that legendary amplifier, and then I made a pedal. I tested the pedal again and again, changing parts as necessary, until I matched the sound I wanted. This is the same process I go through for most of the pedals I design.
What does the Dark switch do, and why did you include it as a feature?
I included the Dark switch to give players the option of a slightly warmer sound. Pushing the switch cuts some of the high end, which is perfect for taming the brightness of silverface or blackface-style amps, or for when you just want a smoother, mellower sound.
One of the coolest things about using effects is all the different ways you can combine them to create entirely different tonal palettes.
The MXR Bass Innovations line has a number of pedals that sound great when chained together, so we put together a list of our favorites. Feel free to experiment with the placement of each effect, as your mileage may vary, but these are our preferred arrangements.
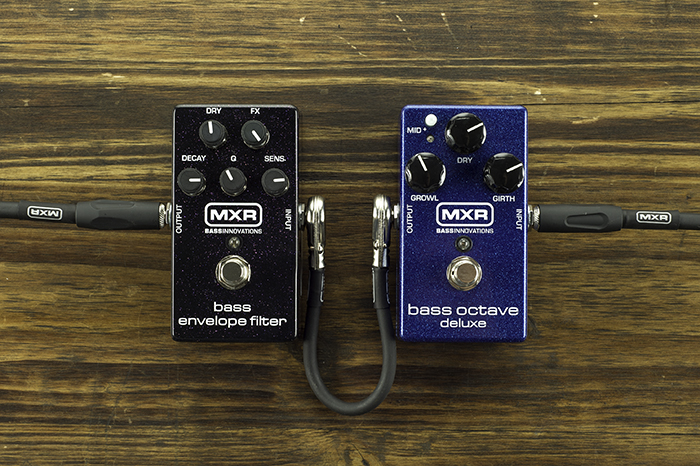
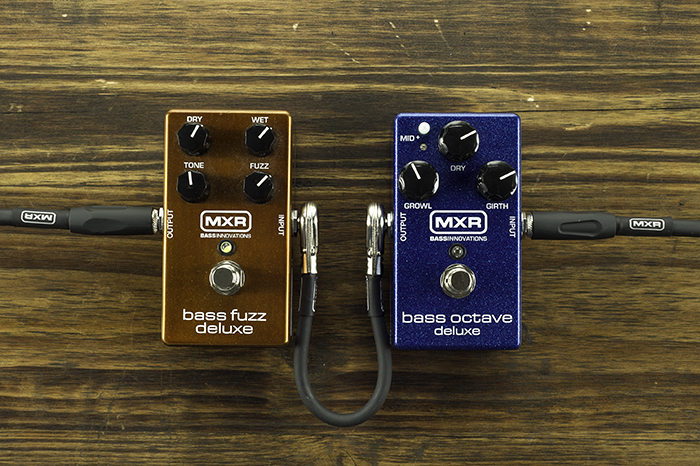
Bass Compressor + Bass Octave Deluxe
Running the Bass Compressor into the Bass Octave Deluxe makes for a tighter, more focused octave effect with an even thicker sounding thump. We can’t say for sure, but a lot of bass players are convinced that Pino Palladino used the compressor+octave combination to get his iconic tone for Paul Young’s “Tear Your Playhouse Down.”
Bass Octave Deluxe + Bass Envelope Filter
Combining these two pedals is the perfect way to get funky synth sounds without having to double up on keys. Run the Bass Octave Deluxe into the Bass Envelope Filter for best results. Check out this clip of the great Tim Lefebvre demonstrating the great range of deep, expressive tones these pedals are capable of when paired:
Bootsy Collins used this effect combination quite often—listen to the song “Bootzilla” for another great example.
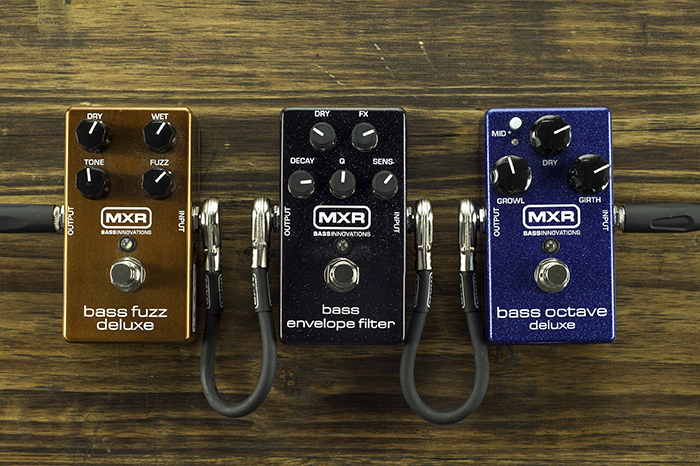
Bass Octave Deluxe + Bass Fuzz Deluxe
Combining the Bass Octave Deluxe and the Bass Fuzz Deluxe is all about subterranean chainsaw grind. Putting the octave pedal in front of the fuzz pedal can fill out the sonic space, fattening up and adding some depth to your signal. Check out “All the Love in the World” from Nine Inch Nails or “No Hassle Night” by the Dead Weather to hear how the octave/fuzz combination sounds when done right.
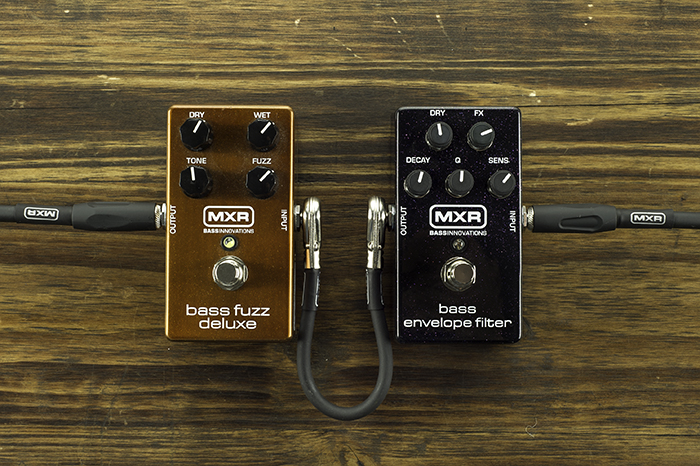
Bass Envelope Filter + Bass Fuzz Deluxe
This combo is all about liquid, percolating funk with a more aggressive attitude. Just run the Bass Envelope Filter into the Bass Fuzz Deluxe and pluck away. Bootsy Collins liked to use this combination a lot, as does Les Claypool.
This combination gives you thick, funky synth-like tones that cut through with hard-charging authority and dynamic expression. Just run the Bass Octave Deluxe into the Bass Envelope Filter into the Bass Fuzz Deluxe. Bootsy strikes again with this one, just listen to “What’s the Name of this Town.”
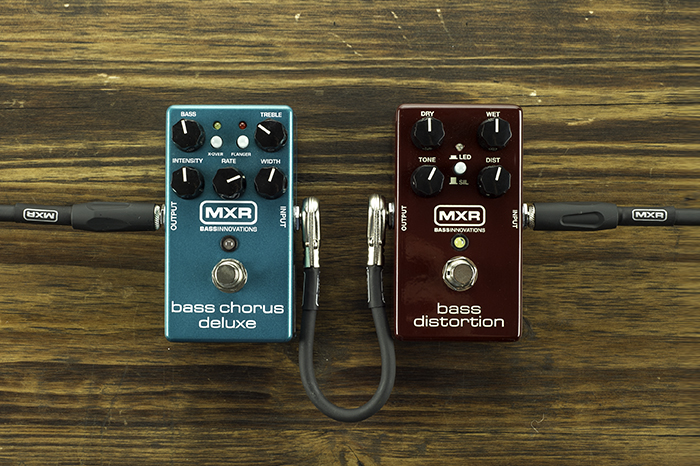
Bass Distortion + Bass Chorus Deluxe
Combining these two pedals—Bass Distortion into the Bass Chorus Deluxe—gives you the dark, spectral sounds chorus pedals are known for, but the distortion adds a whole ’nother level of texture and attitude. For a subtle but effective use of this effect, listen to Puscifer’s “Galileo.” Type O Negative’s “IYDKMIGHTKY (Gimme That)” has a more obvious example.
There’s a ton of other effects combinations available to bass players, but we feel these are the the most basic, foundational combos you should get to know as a bass player. Line ’em up and dig in.
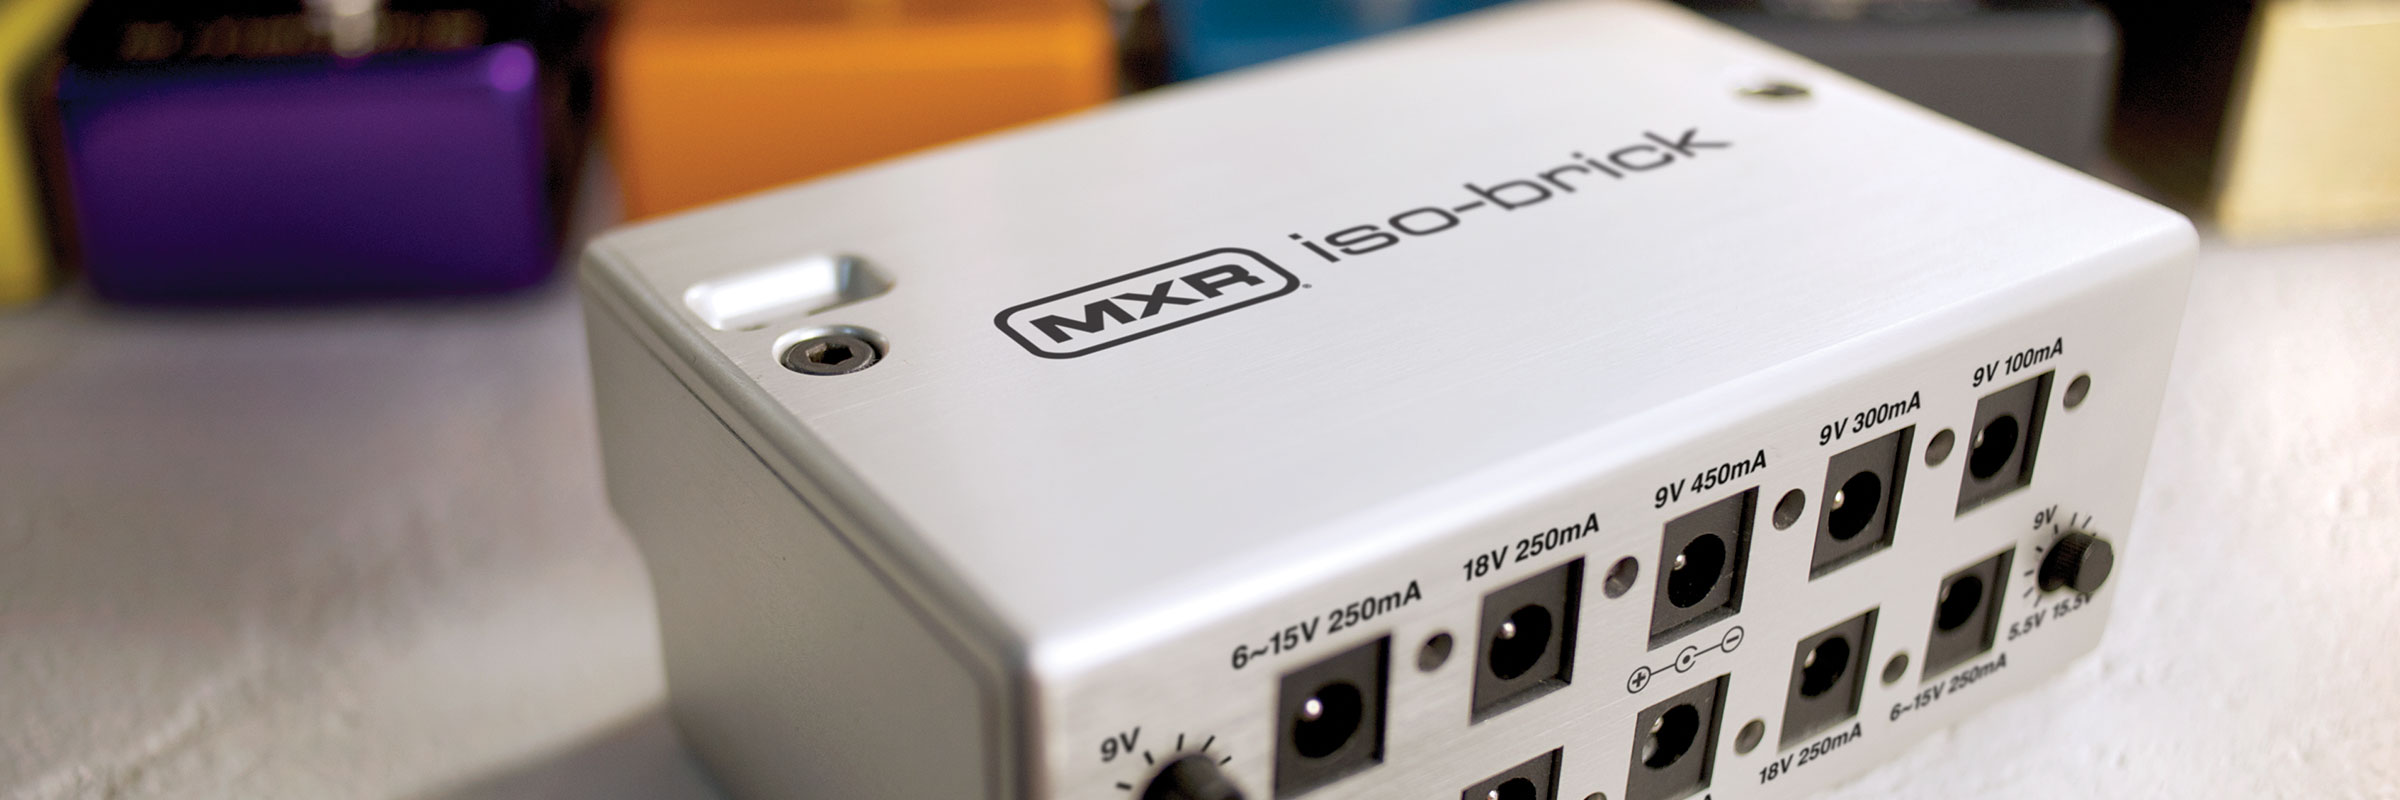
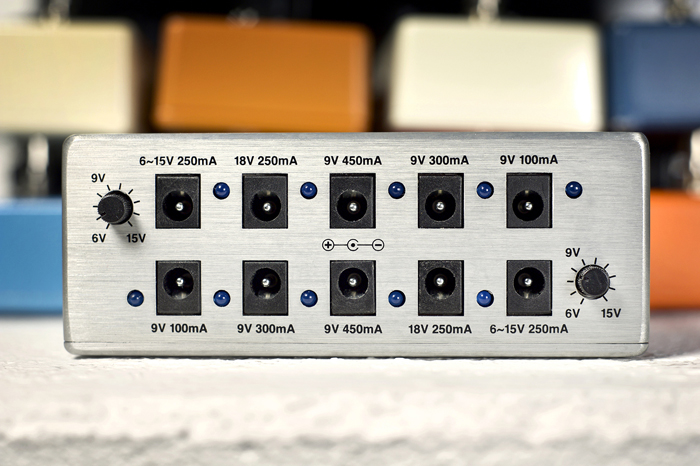
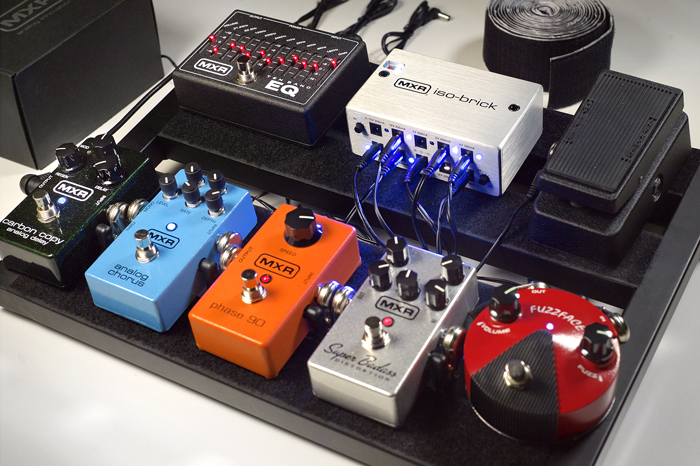
The M238 MXR® Iso-Brick Power Supply is designed for the demands of the stage and the rigors of the road. With ten fully isolated outputs and a lightweight, pedalboard-friendly housing that’s built like a tank, this potent piece of hardware will keep your pedals running with quiet, consistent power gig after gig.
Why does having isolated outputs make a difference? We asked the MXR design team to explain that and more, including several questions on how to get the most out of this wonderful power box. Get inside the Iso-Brick Power Supply below.
What are the advantages of fully isolated outputs?
When power outputs are fully isolated, there is no common electrical connection between them. This provides ground isolation between power sources, eliminating noisy ground loops and making high gain signal chains quieter. It also prevents one pedal from corrupting the power supply of the other pedals if something goes haywire.
Basically, having isolated outputs is like powering all of your pedals with high quality batteries.
Is there anything else in the M238’s design that helps to reduce noise?
Yes—aside from isolating the outputs from each other, we’ve ensured that each fixed voltage output receives a stable, low-noise voltage source by using linear regulators. The variable outputs are regulated by a hybrid design consisting of an adjustable buck regulator and two LC filters—which block switching noise—to simulate the smooth output of an adjustable linear regulator. This was done to minimize heat and power loss in the circuitry while preserving the output characteristics of an adjustable linear power source.
How do fully isolated outputs provide more protection to pedals than non-isolated outputs?
If pedals are powered from just one source—that is, if they aren’t isolated—they can potentially suffer damage if one of the effects experiences an overload or other voltage problem. With an isolated output, that potential damage source is kept from the rest of your pedals.
Is there anything in the design to prevent overheating?
We built in thermal protection for each output, so the M238 will automatically turn itself off if it reaches unsafe operating temperatures. The outputs are also protected against short circuiting via foldback current limiting.
Which types of pedals can be used with the Iso-Brick Power Supply?
You can use almost any pedal—digital or analog, positive or negative barrel—as long as it takes DC power and meets the voltage and current requirements of the M238’s outputs.
How can players make sure they’re matching pedals and outputs correctly?
It all depends on the voltage and current requirements of your pedals, and you need to know both before you ever connect a pedal to a power source. Digital pedals require more current—measured in milliamps (mA)—than analog pedals, so keep that in mind when allocating your outputs between the two types.
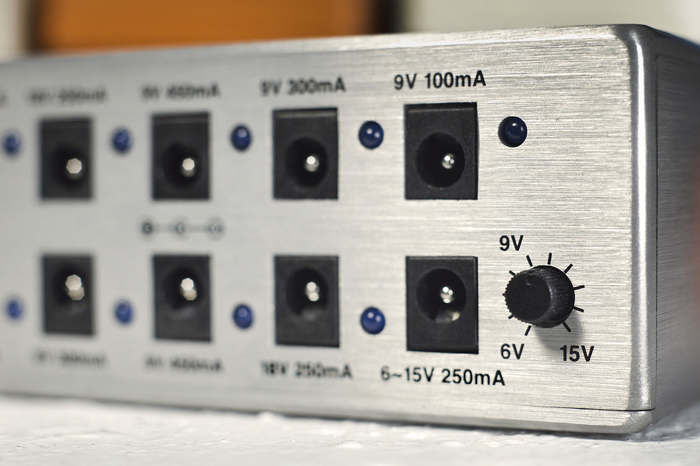
The M238 has six 9V outputs: two at 100mA, two at 300mA, and two at 450mA. The 100mA outputs have more than enough current—by far—for pretty much any 9V analog pedal, but many 9V digital pedals require more current. In that case, the 300mA and 450mA outputs will be more than enough for most digital pedals. If you’re only using analog pedals, it doesn’t really matter which output you use as long as the voltage matches.
The two 18V outputs and the two variable 6V–15V outputs adjustable are rated at 250mA, which is still enough juice for most digital pedals. The vast majority of digital pedals are designed to run on 9V power, however, so you’re likely to use the 18V outputs for analog pedals. If you have odd voltage requirements—up to 15V—or you want to “sag” a 9V analog pedal, then use the variable outputs.
How can I make sure the variable outputs are set to the right voltage?
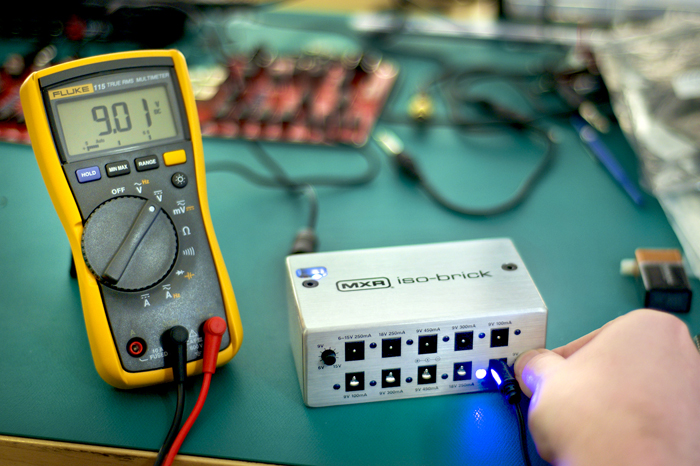
The easiest way is to measure at the end of a connector cable with a multimeter. First, make sure the power supply itself is plugged in, and then plug one of the connector cables into one of the variable outputs. Set your multimeter to measure DCV; if yours doesn’t automatically detect voltage, select the 20 DCV setting. Set the voltage control about where you want it.
Next, use one of your multimeter’s probes to touch the inside center of the plug’s barrel, and use the other probe to touch the outside of the barrel. Your multimeter will then display the output’s voltage. Use the variable control to adjust as needed. Note: whether the number shown on the multimeter’s screen is positive or negative depends on which probe touched which part of the barrel, but that doesn’t matter for our purposes. The value will be accurate either way.
What is voltage “sag”? Which pedals can be “sagged” below 9 volts, safely and with good results?
“Sag” refers to the effect of a dying 9V battery. As batteries get used up, their voltage level goes down, and this changes the sound of certain 9V analog pedals. This effect is called voltage sag, and a lot of guitar players back in the day loved it so much that they would purposely use dying batteries to get it.
The variable outputs allow you to achieve the same effect without the hassle of managing a constant supply of under-powered batteries. Overdrives, distortions, fuzzes, and wahs tend to benefit the most from voltage sag, but you won’t hurt your pedal by under-powering. Feel free to experiment.
Can the M238’s outputs be combined?
Any output may be combined with any other when stacked in series. When combining outputs in parallel, however, you need to make sure that the outputs match each other in voltage.
Are there any features to help players troubleshoot problems?
Yes—the M238 has LEDs to indicate a good or bad connection on both the input and each of the outputs, which allows you to quickly identify the source of a problem.
What precautions should players take when using any type of power supply?
First and foremost, make sure the voltage and current specs of your pedals are compatible with the voltage and current specs of your power supply’s outputs. Ignore this information at the peril of both your pedals and your power supply.
As a general rule, don’t give your pedal too much voltage—for example, by plugging a 9V pedal into an 18V output—and don’t force an output to give up more current than it can handle—for example, by plugging a pedal that draws 250mA into an output that only has 100mA on tap.
Chorus is an effect you should always have in your tool box, whether you’re slamming out riffs, firing off precision-guided arpeggios, or weaving ambient sonic tapestries. You can use chorus to fatten up your sound at lower settings, add depth and fluidity at moderate settings, and go full on space age at extreme settings.
How does it work? Chorus pedals double your signal and then delay the duplicate at a constantly varying rate—usually with an LFO, or low-frequency oscillator—before mixing it back into the original signal. Varying the duplicate signal’s delay time causes pitch shifting thanks to the Doppler effect. This pitch shifting mimics the slightly off-key sound created by a choir of singers—even though they’re singing the same piece of music at the same time, no one person is singing with exactly the same pitch and intonation as any of the others. And that’s why we call it chorus.
Guitar players first got their hands on the chorus effect in 1975 as a feature of Roland’s Jazz Chorus Amp. Pedal versions followed shortly after, but it wasn’t until the ’80s that chorus really found its place in popular music. Since then, artists from all over the stylistic map have embraced the effect, from Alex Lifeson and Andy Summers to Eddie Van Halen and Slash.
The MXR Line
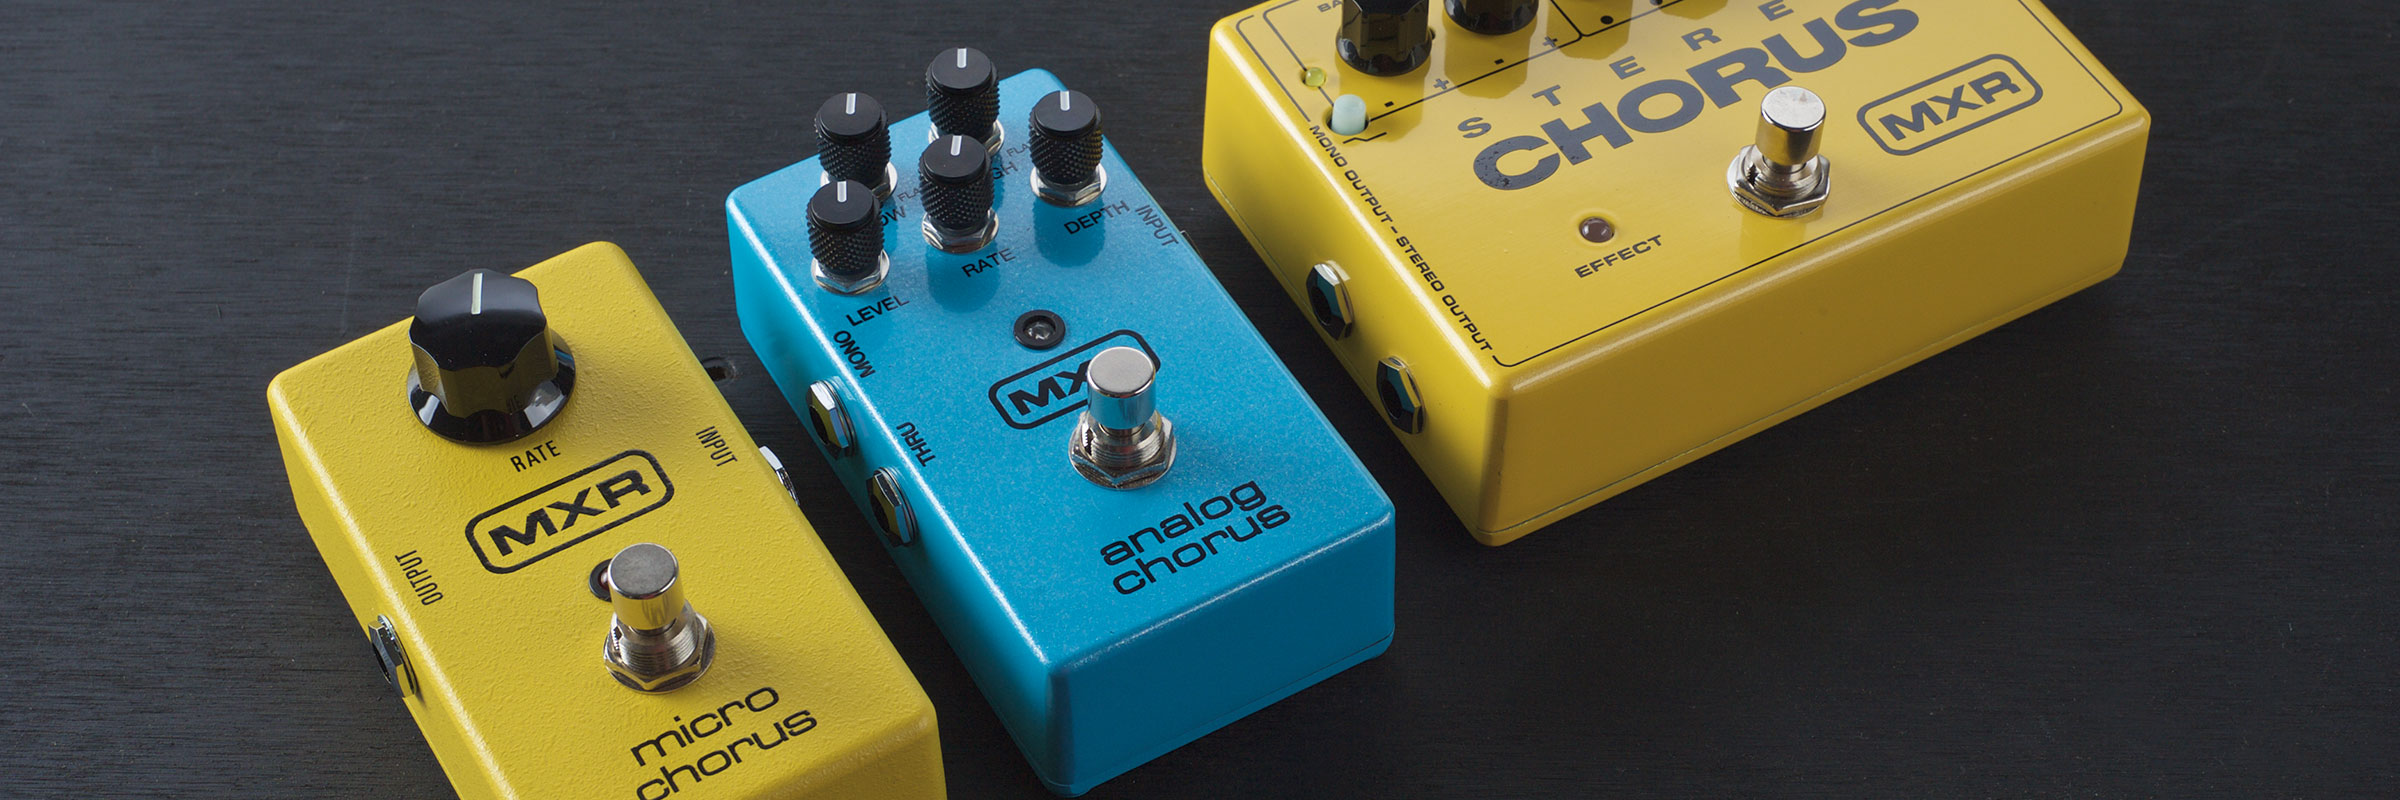
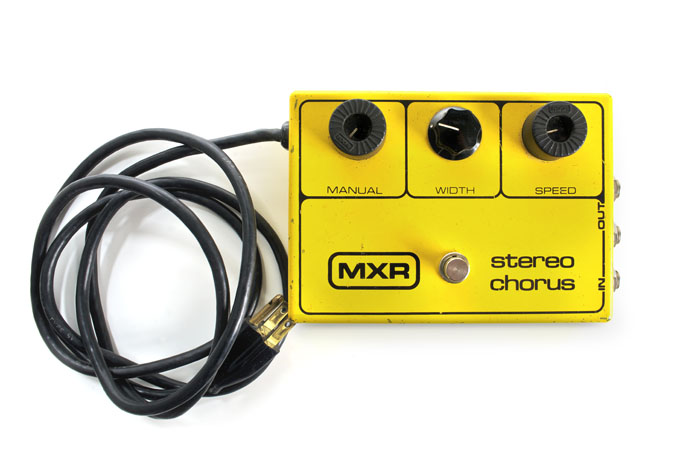
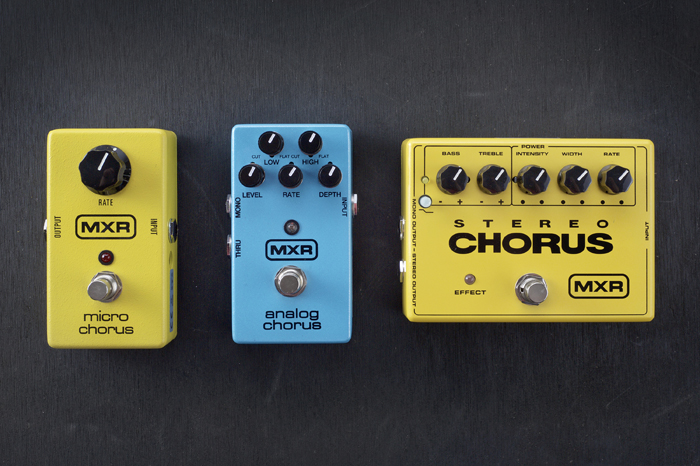
MXR® first entered the chorus market in 1980 with big, yellow, three-knob box simply called the Stereo Chorus. The original Stereo Chorus was all-around great sounding pedal, but its most defining feature was its Manual control. As with the MXR Flanger, the Stereo Chorus’ Manual control allowed players to adjust the effect’s delay time (the Speed control adjusted the oscillation rate).
The Micro Chorus followed the Stereo Chorus in 1981. With a single Speed knob for straightforward operation, this pedal is to chorus what the Phase 90 is to phasing. While compact and easy to use, the Micro Chorus pours out volumes of rich, modulated shimmer with a hint of flange around the edges. A few years back, we re-introduced the Micro Chorus—along with the Micro Flanger—as a faithful reissue of the original circuit.
The Stereo Chorus returned to the MXR line several years ago with a complete circuit overhaul. Today’s version has a very clean, modern sound with a very pronounced pitch shifting quality. Running on 18 volts, the Stereo Chorus now has a ton of headroom. The MXR team swapped out the Manual control for an Intensity control—essentially a wet/dry mix—and added Bass and Treble EQ controls and a Bass Filter switch to remove the effect from low end frequencies.
The Analog Chorus is MXR’s take on the classic “dirty” analog chorus sound. Compared to the Stereo Chorus, its pitch shifting quality is more subtle, but with lower headroom, this pedal breaks up nicely when pushed with a little extra gain. Like the Stereo Chorus, the Analog Chorus has controls to tweak the wet/dry mix and shape the high and low end of the chorus effect. The Analog Chorus is a natural fit for hard rock and metal—just ask Slash and Rise Against’s Zach Blair—but its tweakability makes it an incredibly versatile pedal.
Using the Chorus Effect
How you use a chorus pedal depends on your needs as a guitar player or bass player. Here’s a few tips to get the most out of the effect without overdoing it.
First, have an idea of why you want to add chorus to a song. Adding ambience and movement to a slow piece, making your solo stand out, thickening up strummed passages—these are all good reasons to use a chorus pedal.
When you decide how you want to use your chorus pedal in a song, experiment with different playing styles and control settings. You’ll have to play differently with a subtle tone thickening sound dialed in than you would with a spectral, ambient sound or with an all-out deluge of swirling oscillation.
Finally, try combining chorus with other effects. Experiment. Overdrives, distortions, and delays are a great place to start. If you want to take your modulation game to the next level, try adding a flanger or a phaser to the mix. As for the order of effects, there’s obviously no hard and fast rules, but most guitar players willx tell you to place your chorus pedal after the effect you’re pairing it with. This allows the chorus effect to fully develop and work its magic on the rest of the signal.
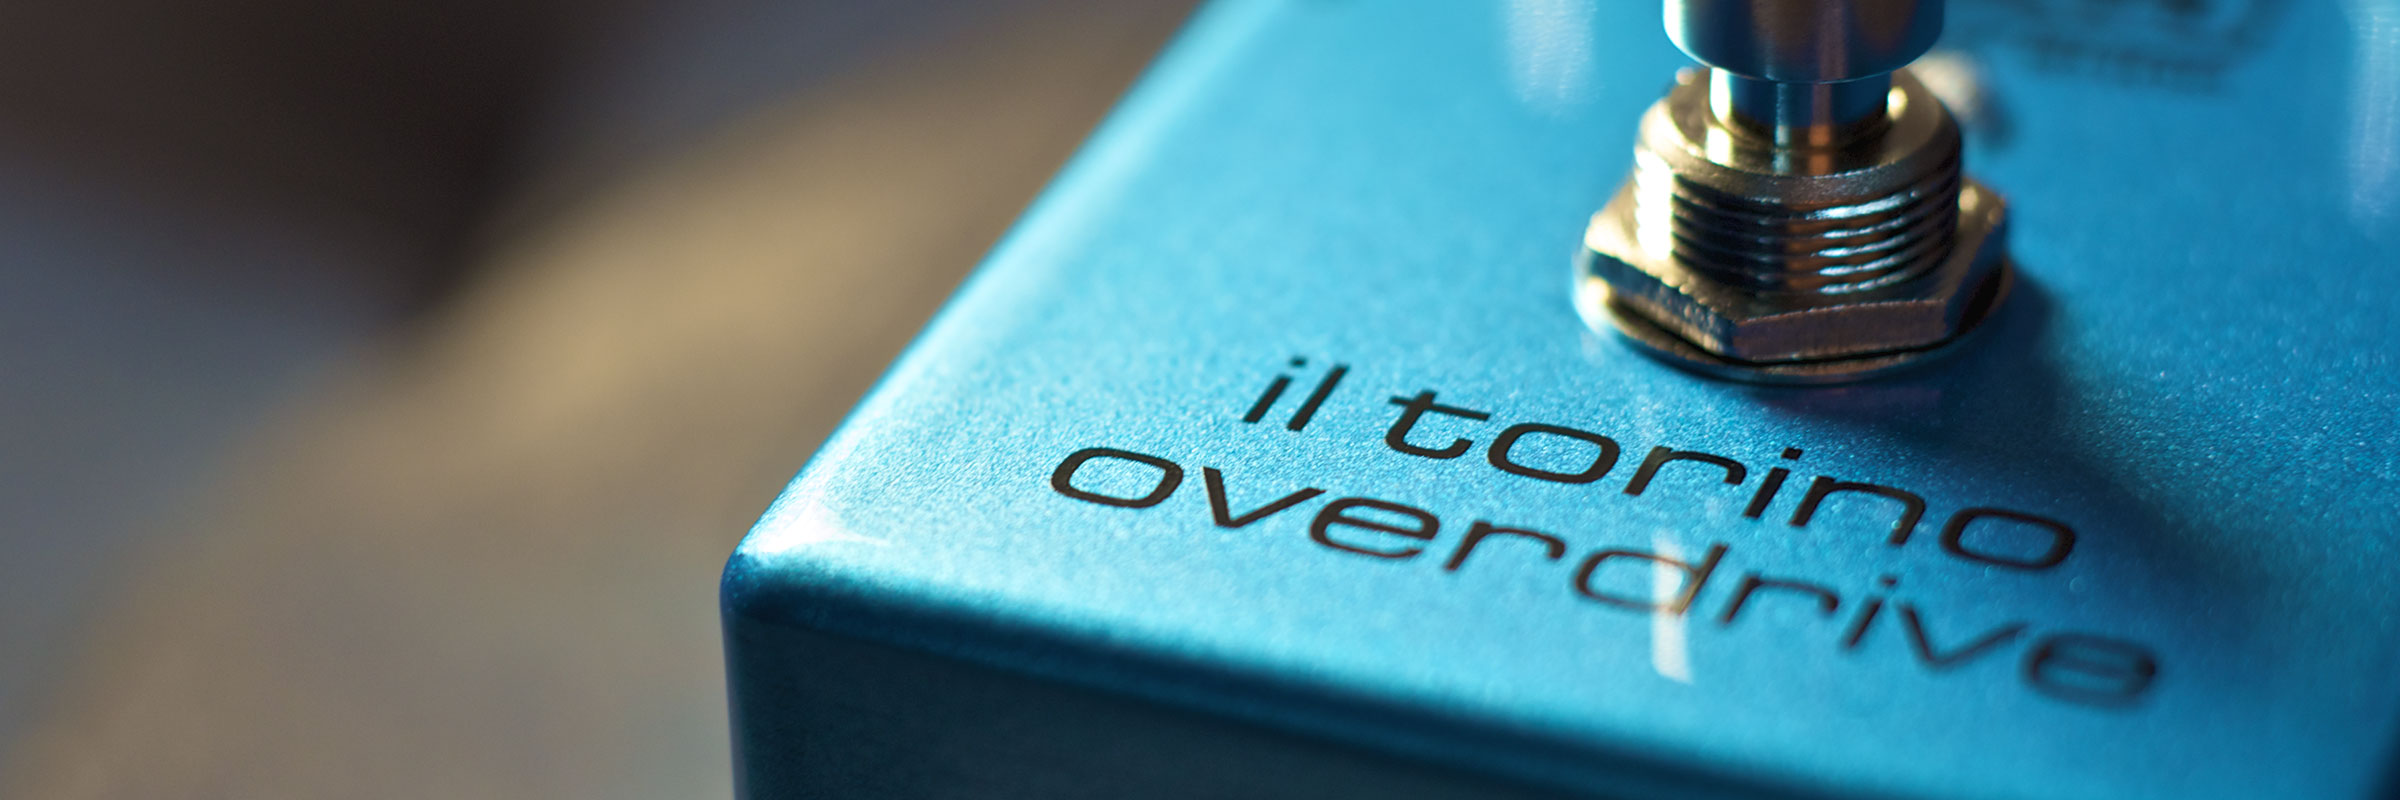
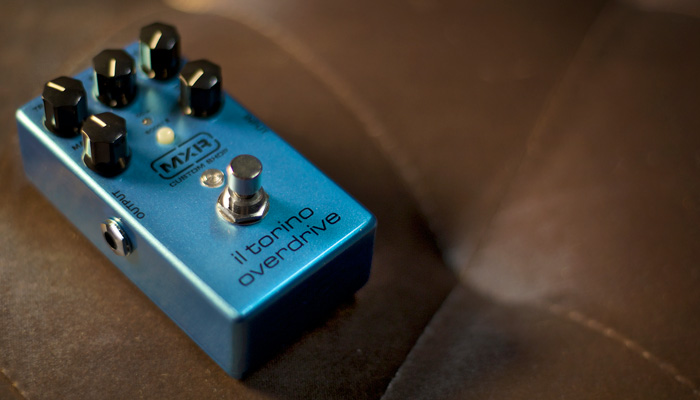
The MXR® Custom Shop is all about sonic discovery. In their effort to explore the furthest reaches of tone, the Custom Shop team invites accomplished independent pedal designers from around the world to contribute their unique perspectives and design styles to the cause. The first such collaboration is the Il Torino Overdrive, a highly tweakable overdrive pedal designed with Carlo Sorasio, Italy’s top tone maestro. He works with Italy’s top musical acts, designing amps and pedals to suit their needs on the road and in the studio.
He sat down to talk with us about his entry into the world of pedal designing and the creation of the Il Torino Overdrive, a highly tweakable OD that’s perfect for guitar players who like to fine-tune each part of their signal chain.
When did you first start designing pedals?
Carlo Sorasio: While attending Polytechnic University of Turin, I studied electronics on my own, particularly analog electronics, using old books I found in the school library. I started out just building pedals for myself as a guitar player. The first was a Dallas Rangemaster clone in 2004, and I modded many other pedals, including ones from MXR and Dunlop.
I started my business in 2007 after completing my mechanical engineering degree. In 2008, I released my first amp commercially and continued to perfect the design until 2010 when I deepened my understanding of PCB and transformer design.
Which artists have you worked with?
Carlo: I have worked with some of the finest Italian guitar players. Some of the most important are Mario Schilirò (guitars for Zucchero Fornaciari), Giacomo Castellano (Thomas Lang, Nannini, Elisa, solo), Massimo Varini (Boccelli, Pausini, Ramazzotti), and Water Donatiello (Gerry Mulligan, Stevie Lacy, Bruno Chevillon).
Stevie Salas: I met Carlo when I was playing a concert a few years back in Turin. When I arrived for sound check, he was there working with the opening act. He showed me some pedals as well as some custom amplifiers.
I get approached a lot by gear designers, and usually they don’t impress me, so I wasn’t that excited. But he was a nice guy, so I decided to plug into the amp he had onstage. As soon as I plugged into it, I knew right away that this was something VERY special. After that, he showed me some of his custom pedals, and needless to say, his overdrive blew my mind. I ended up both the amp and the overdrive for my concert that night and for the rest of the tour! In fact, I have used them on every European tour since.
Stef Burns: I also met Carlo at a Turin gig. He had an amp that he built for me to try, and it rocked!
Carlo, what would you say is your specialty as a pedal designer?
Carlo: So far, overdrive and boost pedals. But I am expanding my range of expertise and am currently working on phaser, flanger and delay effects.
I think that, especially for a self-taught guy like me, it’s normal to start with the overdrive and boost. Simple projects that help to learn the basics. Modulation and delay, however, are more complex, and it takes more skill to avoid simply copying other designs. And these skills can only be obtained through experience and mistakes—lots of mistakes!
Stef: He obviously has knowledge and a talent for building amps and pedals but he also has an ear for tone so he can do it right.
Stevie: I meet many guys around the world who do what he does and the difference between good and great can be measured by a micrometer. Carlo has a way of making amps and effects that sound vintage/modern capturing the best of the old with a little something new in there. He has also found a way to use modern techniques to achieve this making the pedals and amps affordable without losing quality.
Which of his products do you own?
Stef: I have the Blues Devil and it works great for adding a singing tone to clean and extra gain to lead.
Stevie: I have his Il Torino Overdrive in a prototype form and some of his prototype amp heads. Over the years, I have had him do some mods to the pedal.
Have you worked with Carlo to develop any custom gear?
Stevie: We have worked closely on his overdrive, and we are messing with old Jet Phase type effects.
Carlo, which circuit designs have inspired you the most?
Carlo: Well, as I said the Dallas Rangemaster Treble Booster was the first pedal I ever made. It’s a very simple circuit—just 7 components and one transistor—but it’s a pain to make t play well. When you get it, though, it’s amazing. That circuit taught me the importance of each component and how it contributes to the final result.
Tell us about the MXR Il Torino Overdrive. What sound and functionality were you shooting for?
Carlo: The Il Torino Overdrive is an overdrive pedal for fine-tuners. It’s very versatile and very organic sounding at any of its settings. At first, I was searching for a Zeppelin sounding overdrive with a great touch response and a rough tone. These characteristics are still present in the final product, but we ended up with a broader, more versatile spectrum of overdrive with very nice, natural compression.
How did you achieve that goal?
Carlo: I used MOSFET circuitry to recreate the structure of classic tube preamps and LED diodes for their warm, open sound, and I used both local and global feedback to enhance touch response and introduce a bit of asymmetrical saturation. Rolling back the volume on your guitar will clean up the sound without reducing the overall output too much.
You can I was very careful to choose the right components for this pedal, particularly the LED diodes, which are very critical to the tone of the Il Torino.
I made the pedal much more versatile by adding a simple but powerful three-band EQ section. Each of the knobs is highly responsive across their range, so players will be able to fine-tune their overdrive sound to their liking. The last feature I added was the dual mode OD/BOOST switch, which allows players to toggle between the more aggressive overdrive sound and a cleaner sound that has just the right amount of compression and a lot of sustain.
One of this pedal’s main features is that it has a special type of buffered bypass switching rather than true bypass. The type of buffered bypass in the Il Torino uses a Class A Low Impedance Output Driver to maintain natural tonal warmth when using long signal chains. You can’t prevent that kind of signal loss with true bypass.
What type of player will be most interested in this pedal?
Carlo: Players of any style, from blues to hard rock and even fusion, will find this pedal very useful for both their overdrive and boost needs. Especially those who like the sound of handmade boutique amps and like to customize their tone.
What’s the best way to use this pedal? Any particular guitar (humbucker vs. single-coil) and amp combination?
Carlo: The Il Torino is best used with an amp that is just breaking up. It is a subtle overdrive that doesn’t distort basic sound of your guitar, so you’ll still be able to recognize your own tone. As far as specific amps, the Plexy, JCM800, and Blackface-based circuits are the best for this pedal rather than hi-gain amps. I prefer humbucker pickups for the OD mode. It sounds great with single coils, too, but players may want to roll off the treble to balance out the tone.